

Breathe easy in your Ford F-150—swapping out the cabin air filter is simpler than most folks think. The Ford F-150’s cabin air filter sits right behind the glove box, and changing it out yourself is a quick job that’ll make a real difference in air quality and maybe even save you a headache down the road. A fresh filter keeps out dust, pollen, and those weird odors that like to sneak in.
Usually, you’ll notice something’s up when the air smells off or the vents seem weak. Swapping the filter takes just a few minutes—no special tools required. Most filters cost between $15 and $50, so doing it yourself is easy on the wallet too.
Key Takeaways
- The Ford F-150 cabin air filter is tucked behind the glove box
- Replacement is a straightforward, affordable DIY project
- Changing the filter regularly keeps the air fresh and the HVAC happy
Cabin Air Filter Location in the Ford F-150
The cabin air filter is a small but essential part of your F-150’s heating and air conditioning system. Depending on your truck’s year, the spot and access steps might change a bit. Luckily, most folks can handle the job with a few basic tools and some patience.

Model Year Differences
If you drive a Ford F-150 made after 2015, you’ll find the cabin air filter behind the glove box on the passenger side. This holds true for most models from 2015 up through 2025. For older trucks—especially pre-2015—you might not have a cabin air filter at all. Some earlier models or trims have different setups and could need a bit more effort to get to the filter.
It’s always smart to check your owner’s manual to be sure your F-150 actually has a cabin air filter. If your truck’s newer, you should see a filter slot. There are plenty of online guides and videos to help you double-check the filter’s location for your specific year. Knowing your model year keeps you from ordering the wrong filter or wasting time on the wrong steps.
How to Access the Filter
To get to the filter, open the passenger door and clear out the glove box—get rid of pens, papers, manuals, all of it. Squeeze both sides of the glove box inward until the stops clear, then let it drop down. This reveals the filter cover hiding behind it.
The cover is usually a small rectangular door with clips or tabs. Gently press or unclip them by hand—plastic parts snap pretty easily if you rush. Slide the filter straight out. If you spot leaves or gunk, clear them out with a small vacuum or gloved hand before you put in the new filter. Don’t forget to check the airflow arrow on the new filter so it goes in the right way.
Tools Required
Most of the time, you just need your hands to squeeze the glove box and pop the filter cover. Newer F-150’s have tiny screws, so a small 7mm socket and a Phillips or stubby screwdriver is handy in tight spots.
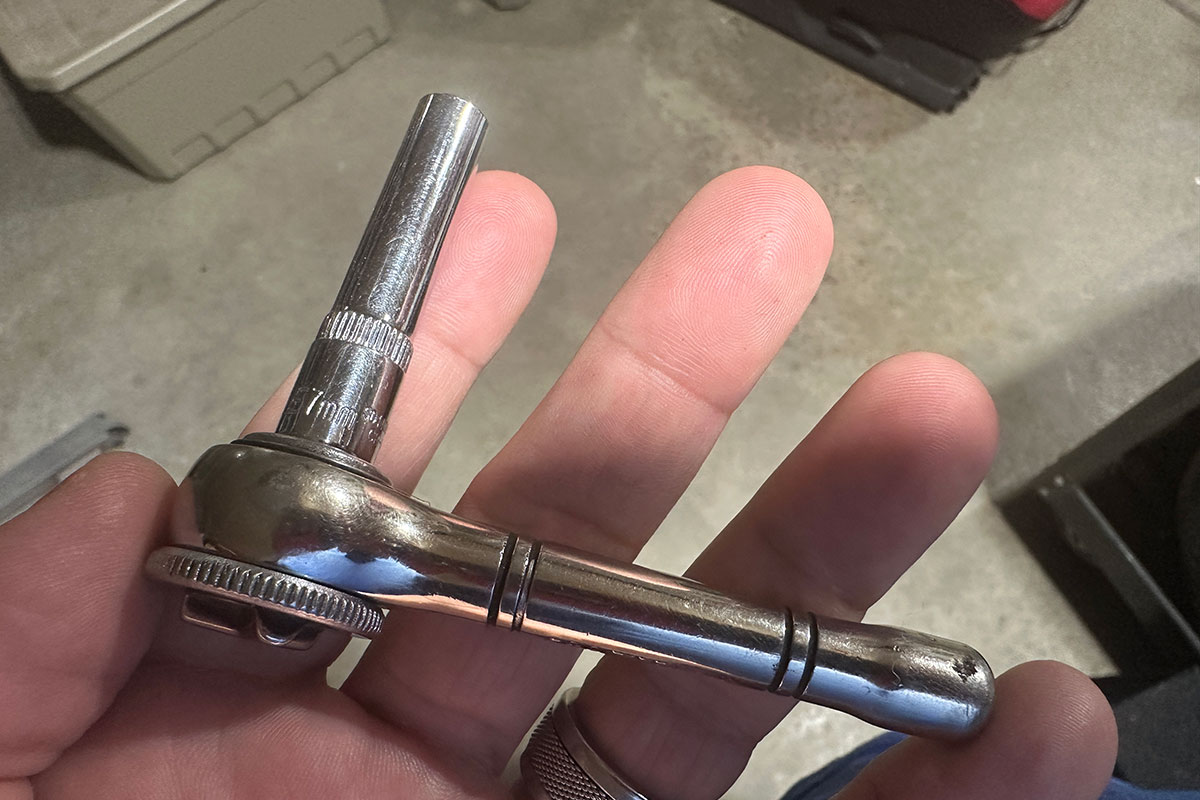
A flashlight helps you see inside, and a vacuum with a skinny nozzle is great for cleaning out the filter compartment. If the old filter’s extra grimy, gloves aren’t a bad idea. No need for power tools or fancy gear—this is a quick fix. For a visual walkthrough, check out this step-by-step guide on YouTube.
Recommended Tools List
- 7MM Socket – Amazon.com – To remove the screws that hold the plastic cover.
- 1/4″ Drive Ratchet – Amazon.com – To remove the screws that hold the plastic cover.
- Ratchet Extension – Amazon.com – To remove the screws that hold the plastic cover.
- Plastic pry bar – Amazon.com – To remove the plastic cover.
- Small Vacuum – Amazon.com – To clean out the cabin filter compartment from debris.
- Head Lamp – Amazon.com – So you can see what you are doing. This is a really good headlamp, see my review here.
- Work Gloves – Amazon.com – Keep your hands clean, these are my favorite work gloves.
Signs Your Ford F-150 Cabin Air Filter Needs Replacement
When the cabin air filter in your F-150 gets clogged up, you’ll probably notice. It’s not just about comfort—your truck’s ventilation can start acting up too.
Common Symptoms
The first thing you might spot is weak airflow from the vents, even with the fan cranked all the way up. That’s usually your filter, stuffed full of dust and pollen, blocking the air.
Musty or moldy smells are another giveaway. Filters that trap moisture can grow all sorts of unpleasantness. Sometimes, you’ll see the inside windows fogging up more than normal—poor airflow makes it tough for the HVAC system to keep humidity in check.
Extra dust inside the cabin, or more sneezing and coughing (especially if you have allergies), are signs you’ve waited too long. Here is a list of these symptoms:
-
Unpleasant or musty odors — persistent acrid, sour, or moldy smells when the AC or heater is on.
-
Poor airflow from vents — blower motor feels weak; HVAC heating/cooling efficiency drops.
-
Windows stay fogged — taking longer to defog or defrost due to restricted airflow .
-
More dust in cabin — fine debris or dust blowing from vents and settling inside.
-
Increased fan noise — whining, whistling, or whirring sounds from the blower motor.
-
Heightened allergy symptoms — sneezing, watery eyes, or coughing while driving if holding too much pollen/allergens.
-
Odor elimination and HVAC restoration — filter change often immediately fixes airflow and odor issues.
Impact on Air Quality
When the filter’s dirty, all those fine particles—pollen, dust, soot—can slip through and end up swirling around the cabin.
Allergy sufferers might notice more itchy eyes or sneezing. It’s not just about comfort, either; breathing in road pollutants or weird smells gets more likely when the filter’s overdue. That stuff will settle on your seats and dash, too.
Effect on HVAC System
A clogged filter makes the HVAC system work overtime. The fan has to push harder, which can make it noisy or even wear out the blower motor faster.
Let it get too dirty, and you’ll notice the heater and A/C just aren’t doing their job. The cab might take forever to warm up or cool down—sometimes it’ll never hit the temperature you want. That’s a pain in extreme weather.
Swapping out a dirty filter brings airflow back to normal and helps your HVAC system last longer.
Step-by-Step Ford F-150 Cabin Air Filter Replacement
Changing the F-150’s cabin air filter is a smart move for cleaner air and a better-working HVAC. With a few tools and the right steps, you’ll be done before you know it—no need to stress about breaking anything.

Removal Instructions
Start by parking your F-150 and shutting off the ignition. Open up the passenger door for easier access.
Empty the glove box—get everything out. Find the side stoppers inside, pinch both sides, and let the glove box swing down. Now you can see the filter compartment in the back.
Look for a rectangular cover. Some have thumb tabs, others tiny screws—check your manual if you’re not sure. Press in the tabs or unscrew whatever’s holding it. Be gentle; the plastic isn’t exactly heavy-duty.
Slide the old filter out. If it’s stuck, wiggle it a bit. If it looks especially filthy or smells terrible, you probably waited too long to swap it.

Installing a New Filter
Before popping in the new filter, vacuum out the compartment to get rid of dust and leaves. That way, your new filter won’t get clogged right away.
Look for the airflow arrow on the new filter—it should point down in the F-150. Slide it in gently; don’t force it. If you’re using a carbon filter for extra odor control, installation’s the same.
Put the cover back on and snap or screw it down. Lift the glove box and snap the sides back into place. Make sure everything lines up so the glove box opens and closes like it should.
Tips for a Clean Installation
Stick with a quality replacement filter that matches your F-150’s year. Good options include FRAM CF12150 or EPAuto CP150—check trusted retailers for the right fit.
Don’t jam the filter in or force anything. Take a second to wipe down inside the glove box and around the compartment for a cleaner finish.
Set a reminder to check or replace the cabin air filter every 12,000 to 15,000 miles, or at least once a year.
Ford F-150 Cabin Air Filter Cost Breakdown
Prices for cabin air filters depend on the brand and type. Labor costs at dealerships or shops can bump up the price, but doing it yourself is by far the cheapest route.
OEM vs Aftermarket Price Comparison
OEM (original equipment manufacturer) filters for the Ford F-150 usually run $25 to $45 each. They fit perfectly and match the factory part’s quality.
Aftermarket filters from third-party brands are often cheaper—think $12 to $30—and sometimes offer extras like activated carbon or HEPA material. You’ll find plenty of choices at places like Walmart and Amazon.
Here’s a quick price breakdown:
| Filter Type | Price Range | Key Features |
|---|---|---|
| OEM | $25 – $45 | Exact fit, Ford branded |
| Aftermarket | $12 – $30 | Similar fit, optional upgrades |
Labor Costs at Dealerships and Shops
If you have a mechanic or dealership do the swap, you’ll be paying for labor, too. Ford dealers usually charge $40 to $100, depending on where you live and whether it’s part of a bigger service.
Independent shops are generally a bit less—expect $30 to $60 for the job. It only takes 15-30 minutes, but shop minimums or hourly rates might still apply. All in, with parts and labor, you’re looking at $55 to $130 for a full replacement, depending on the filter and who’s doing the work.
DIY Replacement Cost
Swapping out the Ford F-150 cabin air filter yourself is way more affordable than having someone else do it. Really, the only thing you’re paying for is the filter, which you can snag for as little as $12–$30 at places like Walmart or Amazon.
You won’t need any fancy tools, and honestly, the whole thing takes maybe 10-20 minutes if you’re not rushing. Most vehicles include simple instructions in the manual, and there’s no shortage of quick online videos to walk you through it. Doing this yourself cuts out labor costs entirely—just pay for the filter, and that’s it.
Choosing the Right Cabin Air Filter for Your Ford F-150
Ford F-150 owners have plenty of choices when it comes to cabin air filters. The right one really depends on your model year, the level of filtration you want, and your own preferences for air quality. It’s not just about grabbing any filter off the shelf.
Recommended Brands and Part Numbers
Big names like FRAM, BOSCH, and Puroma all make filters that fit the F-150. FRAM and BOSCH are popular for their reliability, while Puroma is a go-to if you’re looking for a deal.
Some options worth checking out:
- FRAM CF12150: Delivers solid performance and a snug fit.
- BOSCH 6081C HEPA: Offers advanced filtration—great if allergies are an issue.
- Puroma CF12150: Budget-friendly, with an activated charcoal layer tossed in.
It’s always smart to double-check that your chosen filter matches your F-150’s model year and trim. Full compatibility lists for filters like the BOSCH 6081C HEPA or Puroma Cabin Air Filter are easy to find on Walmart and Amazon.
Standard vs Activated Carbon Filters
Standard cabin air filters catch dust, pollen, and other tiny stuff floating around. Usually, they’re just pleated paper or fiber—nothing fancy, but they get the job done for most drivers.
Activated carbon filters go a step further, adding a charcoal layer to help block odors, smoke, and even some gases. If you’re driving in a city, near factories, or just sick of weird smells, these are worth a look.
Some brands, like FRAM and K&N, offer both types. Activated carbon versions tend to cost a bit more, but if air quality or allergies matter to you, that extra layer seems like a fair trade-off.
Maintenance Tips for Ford F-150 Cabin Air Filters
Taking care of your F-150’s cabin air filter keeps the air inside fresh and the vents working right. When you stay on top of filter changes, driving just feels better—and you’re looking out for your truck’s air system, too.
Replacement Intervals
Generally, you’ll want to swap out the cabin air filter every 12,000–15,000 miles or once a year. If you’re driving through a lot of dust, heavy traffic, or pollen-heavy areas, you might need to change it more often.
How do you know it’s time? Watch for weaker airflow, stale or musty smells, or extra dust showing up on your dash. If you or your passengers start sneezing more inside the cab, that’s a clue, too.
Keeping up with these changes helps your AC and heater work better. Clean filters even help defog windows faster and make the ride nicer for everyone.
How to Extend Filter Life
If you want your filter to last longer, try to keep the air intake system clean. Park away from dusty fields or lots, especially when it’s windy. Giving the floor mats and seats a quick vacuum now and then helps keep extra dirt from piling up inside.
When you can, switch the system to “recirculate”—it limits how much outside air gets pulled in. That’s especially handy if you’re stuck in traffic or driving past construction, since it keeps dust and pollutants out of the cabin filter a bit longer.
Every so often, it’s worth checking around the filter for leaves or random debris. Clearing those out can help avoid clogs or even mold. If you want a little more protection—maybe you’re sensitive to smells—filters with activated carbon are a solid choice. For Ford F-150 owners, there’s a pretty wide range of cabin air filters out there depending on what you need.

Valik loves tinkering in the garage and is currently restoring a 2000 GMC Sierra 1500 truck. He also writes about the progress on this blog. When not in the garage, Valik is also a web developer and a blogger. I know, strange, a hand in two completely different worlds. And that is the way he likes to keep it.


