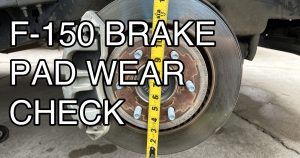
Brake pad replacement for a Ford F-150 usually runs between $184 and $207 per axle, depending on parts and labor. A lot of F-150 owners are surprised to find out that with some basic tools and a bit of patience, they can handle this job at home. Keeping up with brake maintenance is key for both safety and performance.
Knowing when and how to swap out brake pads can save you a good chunk of change. This guide covers the typical costs and lays out a straightforward, hands-on process for folks who want to tackle it themselves. Getting familiar with the steps helps avoid common mistakes and makes the job less daunting.
Key Takeaways
- Average brake pad replacement costs between $184 and $207 per axle
- Knowing when to replace pads and checking rotors extends brake life
- A step-by-step DIY guide makes the replacement process easier
Ford F-150 Brake Pad Replacement Cost Overview
Brake pad replacement costs on a Ford F-150 can vary a lot—depends on which pads need changing, your shop of choice, and whether other brake components need attention. Prices shift depending on where you live and who’s doing the work.

Average Cost for Front and Rear Brake Pad Replacement
Most owners pay somewhere between $115 and $300 per axle for new brake pads, labor included. Labor is usually $80-$120, and pads run $35-$150, depending on what you pick.
Front brake pads wear out faster—no surprise there, since they do most of the stopping. You’ll probably be swapping those out twice as often as the rears.
For all four wheels, expect the total to land between $230 to $600. It really depends on whether you go with standard or premium pads, and if you stick with Ford originals.
Factors Affecting Brake Pad Replacement Cost
Several things can nudge the price up or down:
- Type of brake pads: Ceramic pads cost more than semi-metallic or organic ones.
- Labor rates: These can swing a lot by region and shop.
- Model year and F-150 trim: Newer models or certain trims sometimes mean bigger, pricier brakes.
- Condition of rotors: If rotors need resurfacing or swapping, the bill goes up.
- Additional repairs: Caliper work or brake fluid flushes add to the cost.
Location matters, too. City shops usually charge more than rural ones.
Cost Comparison: Dealership vs. Independent Shops
Dealerships usually come in at the higher end, sometimes $295 or more per axle. Independent mechanics or chain shops often do the same job for $184 to $258 per axle, usually with aftermarket or equivalent pads. Some places even throw in coupons or deals.
For a basic pad swap, either option works. If you want Ford parts or warranty coverage, the dealer makes sense. If you’re just looking to save, a good local shop is hard to beat.
Cost of Complete Brake Repair for F-150
A full brake job—pads, rotors, maybe calipers—bumps the cost up. If rotors are warped or worn, they’ll need resurfacing or replacement.
Expect a full brake job (pads and rotors) to run $350 to $800 per axle. If calipers are shot too, you could be looking at $1,200 or more for both axles.
Here’s a quick cost breakdown:
| Service | Cost Per Axle |
|---|---|
| Brake Pad Replacement | $115 – $300 |
| Brake Pad & Rotor Replacement | $350 – $800 |
| Complete Brake Repair (incl. calipers) | $800 – $1,200+ |
When to Replace Brake Pads on a Ford F-150
It’s important for F-150 owners to know when their brake pads need changing. Swapping them on time keeps your truck safe and helps avoid bigger repair bills.
Recommended Brake Pad Lifespan and Mileage
Ford and most mechanics suggest checking pads every 15,000 to 20,000 miles, but honestly, some pads last 30,000 to 70,000 miles. It all depends on the pad type and your driving style.
Organic pads wear out quickest. Ceramic and semi-metallic last longer. Best bet? Check them every oil change or at least every other service. If the pad material is down to 3mm or less, it’s time for new ones.
Following this routine helps dodge problems like worn rotors or sketchy braking. Always double-check your owner’s manual for specific advice.
Warning Signs of Worn Brake Pads
Your F-150 will usually let you know when pads are shot. Watch (and listen) for:
- Squealing or grinding noises when you hit the brakes
- Longer stopping distances or a mushy pedal
- Vibration or pulsation when braking
- Dashboard warning lights—brake or ABS
- Visible pad wear: if the pad looks thinner than 1/8 inch, swap it
Putting off pad replacement can trash your rotors and make repairs pricier. Don’t wait when you spot these signs—just get it done.
Impact of Driving Habits on Brake Pad Wear
How you drive really matters. Stop-and-go traffic, hauling heavy stuff, towing, or lots of hills? Pads will wear faster.
Folks who commute in city traffic or brake hard a lot will burn through pads quicker. Highway miles with fewer stops? Pads last longer.
Heavy loads or trailers make your brakes work overtime. If you tend to coast to stops and avoid slamming the brakes, you’ll get more life out of your pads. Good habits and regular checks help you avoid surprise repairs.
Step-by-Step DIY Brake Pad Replacement for Ford F-150
Taking on brake pad replacement yourself? You’ll need some planning, the right tools, and a focus on safety. Following a clear process helps you get it done right.
Tools and Materials Needed
You don’t need a ton of fancy gear, but here’s what you’ll want: a jack, jack stands, a lug wrench, and a socket set. You’ll also need a C-clamp or brake caliper tool to push the piston back in.
Don’t forget brake cleaner, gloves, and safety glasses. Make sure you’ve got the right pads for your F-150. Sometimes new pads come with hardware or clips—if so, use them.
A torque wrench is handy for tightening the lug nuts to spec. Keep your work area tidy, and have a small dish for bolts so nothing goes missing. Here’s the list:
| Tool / Material | Purpose | Need It? Get It! |
|---|---|---|
| Jack | Lift the truck | Buy on Amazon |
| Jack Stands | Secure the truck | Buy on Amazon |
| Lug Wrench | Loosen/tighten wheel nuts | Buy on Amazon |
| Socket Set/Wrenches | Remove caliper bolts | Buy on Amazon |
| C-Clamp/Caliper Tool | Compress caliper piston | Buy on Amazon |
| Brake Cleaner | Clean brake components | Buy on Amazon |
| Gloves & Safety Glasses | Personal protection | Buy on Amazon |
| New Brake Pads | Replacement part | Buy on Amazon |
| Torque Wrench | Properly tighten bolts/lug nuts | Buy on Amazon |
Preparation and Safety Precautions
Before you start, park the F-150 on a flat, solid surface. Set the parking brake. Gloves and safety glasses? Always. Brake dust and chemicals aren’t your friends.
Check your owner’s manual for jack points and safety tips. Use both a jack and jack stands—never trust just the jack. Lay out your tools and pads before you lift the truck.
Make sure there’s decent lighting, and try to limit distractions. Take your time. When you’re done, don’t just toss the old pads—dispose of them properly.
Removing the Wheel and Caliper
Start by loosening the lug nuts (don’t take them all the way off yet). Jack up the truck and set it on jack stands. Now take off the nuts and remove the wheel—you’ll see the caliper.

Find the caliper bolts or pins at the back. Use a socket or wrench to remove them. Carefully lift the caliper off the rotor. Don’t let it hang by the brake hose—support it with a wire or set it on something sturdy.
With the caliper off, you’ll see the brake pads in their bracket. Take note of how they’re sitting and check for uneven wear. Set the old pads aside and give the caliper a quick look for damage or leaks before moving on.
Replacing the Brake Pads and Reassembling
Start by compressing the caliper piston with a C-clamp or caliper tool. (I personally just use a large flat head screwdriver and pry it gently until the piston is compressed.) Use the old pad as a buffer against the piston, then slowly tighten the clamp until the piston’s all the way in. You need this clearance so the new, thicker pads actually fit.
Slide the new brake pads into the caliper bracket, matching the original direction. If your pad set came with new shims or clips, pop those in now. Dab a bit of brake grease on the back of the pads where they touch the bracket—just enough to keep things quiet, not messy.
Set the caliper back over the new pads and rotor. Tighten the caliper bolts—don’t go overboard, but make sure they’re snug. Put the wheel back on, hand-tighten the lug nuts, lower the F-150, then finish tightening with a torque wrench to spec.
Before heading out, pump the brake pedal a few times to seat the pads and make sure the pedal feels solid. Take a quick look for leaks or anything missing around the caliper and wheels before driving off.
Brake Rotors and Other Critical Components
Some parts of the braking system—like rotors, calipers, and brake fluid—are absolutely crucial for safe, smooth stops. Keeping these in good shape just makes life easier down the road.

Deciding Whether to Replace or Resurface Brake Rotors
Rotors take a beating. They get worn, warped, or grooved over time. If a rotor’s still thick enough, resurfacing can smooth out minor grooves and warping.
But if the rotor is too thin, badly scored, or cracked, it’s time for a new one. Running worn rotors leads to noise, fading, or a shaky pedal. Swapping in new rotors with pads is usually a safe bet—it keeps everything working together and can make the pads last longer.
Signs your rotors need help:
- Pulsing or vibration when braking
- Deep grooves
- Rust or weird discoloration
Always check the minimum thickness spec from the manufacturer before resurfacing or reusing a rotor.
Inspecting Brake Calipers for Wear
Calipers press the pads onto the rotors. If one sticks or leaks, you’ll get uneven pad wear and weak brakes.

When you’re changing pads, keep an eye out for:
- Leaking fluid near the caliper or piston
- Torn or missing rubber boots
- Calipers that feel stiff or won’t move freely
If a caliper’s sticky, sometimes new slide pins help, but sometimes you need a whole new caliper. If one side’s pads are worn way more than the other, that’s a red flag. Keeping calipers in good shape helps everything work smoothly.
Checking and Topping Off Brake Fluid
Brake fluid does the heavy lifting from your foot to the pads. Low or dirty fluid can mess with stopping power and hurt other parts over time.
Pop the hood and check the master cylinder reservoir. The fluid should be near the “MAX” line and look clear or light amber. If it’s dark, cloudy, or keeps dropping, you could have a leak or need a flush.
Quick steps:
- Wipe off the cap and area before opening.
- Only add new, correct-type brake fluid if it’s low.
- Never reuse old or dirty fluid.
Checking brake fluid regularly is a small thing that pays off in safer stops.
Tips to Reduce Brake Pad Replacement Costs
There are a few ways to keep brake pad maintenance costs from getting out of hand. Picking the right pads and doing basic upkeep can really help avoid bigger bills later.
Choosing the Right Brake Pad Type
The kind of brake pads you put on your F-150 matters—a lot. Ceramic pads cost more up front, but they usually last longer and don’t make as much dust. Semi-metallic pads are cheaper, but they wear out faster and can be a bit noisier.
It’s worth comparing brands for quality and warranty. Cheaper pads might seem like a deal, but you could end up changing them sooner than you’d like, which adds up over time.
Some folks use organic pads, but those wear down the fastest and aren’t great if you tow or haul much. Always double-check your owner’s manual before buying anything.
| Brake Pad Type | Average Cost (Pair) | Durability | Best Use Case |
|---|---|---|---|
| Ceramic | $60–$100 | High | Daily driving, low dust |
| Semi-metallic | $30–$70 | Medium | Heavier use, towing |
| Organic | $25–$50 | Low | Light driving only |
Performing Regular Brake Maintenance
Checking your brakes now and then and keeping them clean can stretch out pad life. Take a look at pad thickness every oil change, and don’t let them get below 1/4 inch.
Cleaning off brake dust and dirt helps prevent uneven wear. If you hear squeaking or grinding, don’t ignore it—those noises are warning signs.
How you drive matters too. Try to avoid hard stops, and don’t ride the brakes downhill. Little habits like that make a difference. If you use your F-150 for tough jobs, rotating pads and checking for sticky calipers can help save money. And yeah, following the service schedule in your manual is still the best advice.
Common Mistakes to Avoid During DIY Brake Pad Replacement
Doing your own brake pad swap on a Ford F-150? There are some common trip-ups that can lead to noise, weak brakes, or even damage.
Incorrect Brake Pad Installation
Putting the pads in backwards or crooked is a classic mistake. If you do, expect squeaks, uneven wear, or lousy stopping.
Before installing new pads, clean the caliper bracket and use brake lube (sparingly!) on the contact points—not the pad face. Line up the metal clips or shims properly, since getting this wrong can cause rattles or knocks.
Torque all caliper bolts to factory specs. Too loose and things shift; too tight and you could strip threads. Always double-check your work before moving forward.
Neglecting Brake Rotor Condition
Lots of folks focus on pads and ignore rotors. But worn or warped rotors can make your brakes pulse, squeal, or take longer to stop, even with fresh pads. Inspect for grooves, rust, thickness, and warping before installing new pads.
Use a micrometer to measure thickness and compare it to the minimum in your manual. If it’s too thin, replace it. If it just has light wear and is still thick enough, resurfacing is an option.
Rotor red flags:
| Problem | What to Check |
|---|---|
| Pulsation while braking | Rotor warping |
| Grooves or scoring | Surface damage |
| Rust | Deep pitting or flaking |
Take care of rotors as needed so your new pads don’t wear out too soon.
Forgetting Brake Fluid Checks
Brake fluid is crucial for safe braking, but honestly, it’s easy to forget about. When you put in new pads, the caliper piston gets pushed back, and that can make the fluid level rise in the reservoir. If you don’t check for overflow, you might end up with leaks—and yeah, brake fluid can ruin paint in no time.
Take a quick look at the fluid level before and after you compress the pistons. If it’s up near the max line, it’s smart to pull a bit out with something like a turkey baster or a syringe. That way, you won’t make a mess. Always top off with fresh brake fluid that matches your car’s specs.
Old fluid? It’s not great. It absorbs moisture and doesn’t handle high heat very well. If you see it looking dark or grimy, that’s a hint—it might be time for a full flush or even a replacement, just to keep things working the way they should.

Valik loves tinkering in the garage and is currently restoring a 2000 GMC Sierra 1500 truck. He also writes about the progress on this blog. When not in the garage, Valik is also a web developer and a blogger. I know, strange, a hand in two completely different worlds. And that is the way he likes to keep it.